Showing posts with label mini-album. Show all posts

2.05.2014

Valentine's Day Craft Projects

Valentine's Day is just around the corner and I've been filling up on gourmet chocolates! To celebrate the holiday of love, I've gathered together three of my favorite Valentine's Day craft projects (free of extra calories).


Supplies: Craft Glue Dots®, toilet paper rolls, tag stencil (2 3/8" x 9/16") + small hole punch OR tag punch, brown ink, small bird stamp, small letter stamps, white cardstock, red cardstock, heart punch (1"), brown buttons, white floss, hemp rope, birdseed ornaments (click here for directions).


Supplies: Glue Dots® (Micro, Lines, Ultra-Thin), Maya Road coaster book, Fancy Pants cardstock, BoBunny journal pages, Basic Grey stickers, Prima flower, StazOn black ink, small hole punch, square photos, white cardstock, paper trimmer.


Supplies: 3 Valentine's Day chocolate box lids (small, medium, large), Glue Dots® (Lines, XXL), drill, fishing line, ribbon (2 1/2" wide), scissors, Maya Road star pins.

Hope your Valentine's Day is sweet! ~Danielle

Related:

Trinket Box Video Tutorial
Repurposed Pie Pan
Toilet Paper Roll Chandelier

1.22.2014

The Start of My 365 Grateful Project


A new year. A new project. It seemed right to start my 365 Grateful project after the loss of my German Shepherd on New Year's Day, so I shared my first tweet of the year:

I am grateful for spending over 12 years with our lovable Tabby girl. 
She will be deeply missed. #365grateful

This project will get me back into the habit of daily tweeting and to cherish life's moments, both big and small.


My 365 Grateful mini scrapbook cover is ready to go, along with the first page of assorted stickers. I'm keeping a calendar handy to write down my tweets and photos I take for the project.

Not every day will have a photo or will be shared to Facebook, but each grateful moment will be shared on Twitter. You can follow along on my personal Twitter account, @OhioDanielle, and look for updates here throughout the year. ~Danielle

Related:

12.18.2013

10 Craft Projects for the Holiday Gift Shop

As a child, I always looked forward to my elementary school's Santa Shop so I can purchase gifts for my family (and a couple for me). When the opportunity to sell craft projects at my children's school presented itself, I knew my girls would be excited and I could put a huge dent in my craft stash.

Below are ten projects for this year's holiday gift shop.

1. Melted Record Ornaments:


2. Mini Christmas Notebooks:


3. Christmas Chalkboard Ornaments:


4. Wine Cork Candle:


5. Girl Scout Notebook + Decoupaged Comic Book Pencil:


6. Melted Record Candy Bowl:


7. Upcycled Decoupaged Bangle Bracelets:


8. Cereal Box Notebooks:


9. Decorated Tootsie Roll Banks:


10. Glittered CD Ornament:


I wish I had more time to craft since it was so enjoyable making affordable projects (all under $3) for children to give their friends and families this holiday season.

Are you getting crafty for the holidays? ~Danielle

Related:

An Eco-Friendly Christmas Scrapbook Layout
Eco-Christmas Round-Up: 12 Crafty Gift Ideas
I wrapped a gift with newspaper and made a bow

1.30.2013

Valentine's Day Tutorial: Coaster Scrapbook


This little coaster scrapbook represents the early years of my relationship with my husband. I've called it Pics From The Vault since the majority of photos have never been shown to our children...until now. 

Many of the photos were taken while we were still dating at the end of 1999 and into 2000. To make them look like Instagram prints, I photographed the originals and downloaded them to my computer. Using Picasa, I cropped the photos into squares, added a black and white filter, along with the Holga-ish filter and printed them at Shutterfly (click here for my Instagram-printing tutorial).

Let's have a look inside:


I purged supplies from my stash, used a coaster book from Maya Road and my trusty Glue Dots®. The love-themed Fancy Pants cardstock and journal pages from BoBunny were purchased a few years ago, so I'm happy to see these finally get used (especially the cardstock with two blue birds). Here's how I made it:

Supplies:

Glue Dots® (Micro, Lines, Ultra-Thin)
Maya Road coaster book
Fancy Pants cardstock
BoBunny journal pages
Basic Grey stickers
Prima flower
StazOn black ink
small hole punch
square photos
white cardstock
paper trimmer

1. Remove chain from coasters and set aside. 
Trim cardstock to fit coasters and attach using Glue Dots Glue Lines®. 

 
2. Punch holes into cardstock for chain.


3. Decorate the coaster book with journal pages, photos and embellishments. 
Adhere decorations to book using Ultra-Thin and Micro Glue Dots®.


4. Ink the edges of the coaster book pages.


5. Type journaling on word processor, print on white cardstock and use paper trimmer to cut the lines into strips. Use Glue Dots Glue Lines® to attach the word strips to the coaster scrapbook.


6. Insert chain back through coaster scrapbook and secure clasp.

After I was done, I excitedly shared this coaster book with my girls and hubby. It feels great to finally document these photos and dig deep into my scrapbooking stash for a little purging.

What supplies have you been holding onto for too long? ~Danielle

Related:

8.29.2012

12 Upcycled Crafts for Every Month of the Year

What can I upcycle today? That's the first question I ask myself when starting a new craft project. If you're reading this right now, I know you often ask yourself that very same question.

Over the past year or so, I've meshed together recycling and crafting. The result: an arsenal of upcycled crafts for every month of the year.

12 Upcycled Crafts for Every Month of the Year

Each project is made from items that often end up in the trash or recycling bin. All of them are craft tutorials I created during my time as a Glue Dots designer and most are crafts for children or ones they can make too.


When I first joined the Glue Dots design team in 2010, I was still trying to find my niche amongst the many crafty and brilliant bloggers I've had the pleasure to discover. Over time, I realized that I love turning trash into treasure and being eco-friendly in the craft room. What was the last thing you recycled while crafting? ~Danielle

7.25.2012

I'm a Zutter Certified Instructor!

As I mentioned last week, I recently traveled to Chicago for a one-day course on the Zutter brand. The end result? A class of Zutter Certified Instructors and I'm one of them! That means I met some really cool and crafty people AND I'm starting to teach classes both on and offline.

Top: Kimberly S., Kimberly C., Joe M., Cheryl, Jennifer, Candice, Danielle (me), Kendra, Betsy. Bottom: ?, Steph, Joe R., Betty, Carole.

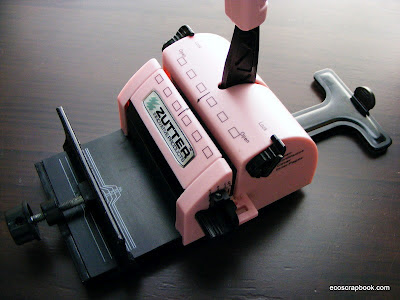
Jennifer Priest, also known as Hydrangea Hippo, was our instructor and we focused our learning on the Bind-it-All:


I'm happy to have this pink book-binding tool in my arsenal and actually know how to use it. The Bind-it-All isn't just for books either. You can also make organizers, wall hangings and much more. There are plenty of ideas at the Bind-it-All blog and Zutter Zisters so be sure to check them out.

And if you know my scrapbooking style, you also know that I love to distress the edges of paper and photos. Say hello to my new favorite time-saver:


The Distrezz-it-All is powerful, loud and fun to use. I distressed an entire mini book in less than a minute! Oh, yeah, baby! I've been using this on everything (except fabric since that's a no-no).

And finally, meet the Round-it-All:


You may already have a corner rounder like the old Creative Memories favorite. This doesn't do just one page or one photo at a time. The Round-it-All can round the corners of a small stack of photos or paper and it's perfect for cardboard.

Now it's time to see what I made in class...

It took some muscles to punch through this textured canvas art board by Zutter, but the look is worth it.

Zutter 8x8 Canvas Art Board

Then we played with a cover-all and bound together cardboard, paper bags, tags, gift cards and paper (with rounded corners courtesy of the Round-it-All). The cover-all adds a nice touch and can turn an ordinary project into something more sophisticated.

Zutter Bamboo Spine Cover-All for 8x8 pages and page protectors.

My favorite cover used during the class was a simple corrugated cardboard. I'm looking forward to tearing off the top layer and decorating the cover.

Zutter 7x7 Corrugated Board

Back at home, I had to reorganize my craft space in order to make room for my Zutter products. One thing that had been shuffled from one place to another over the years was a 2001 desk calendar. I had a light bulb moment and made a calendar journal with a cover.

Repurposed Handmade Paper Calendar Journal

And I finally made Girl Scout cookie box notebooks! I've been saving cookie boxes for over a year and cut them, along with notebook paper to fit, earlier in the summer. With the knowledge I learned at the Zutter course, I quickly punched, bound and distressed all these notebooks in one afternoon.

Girl Scout Cookie Box Notebooks

Then I had to get my "distrezz" on with a scrapbook layout:

"The Girls" 8.5x11 Scrapbook Layout

I used textured 8.5x11 cardstock, blue cardstock from my scrap bin, October Afternoon* cardstock and sticker, Jillibean Soup* letter stickers, black ink, letter stamps, ribbon with a Cosmo Cricket* Gluber and one decorative pin. (Companies with * offer eco-friendly products and are EcoScrapbook Approved.)

Well, that about does it for my most recent projects. I'm now on the hunt to find local businesses to offer my services to, as well as developing classes with my own personal touch and finishing up the projects above. Stay tuned! ~Danielle

Related:

Tutorial: Upcycled Summer Memories Container
Sending a Little Love to Ohio & Michigan Bloggers
EcoScrapbook: As Seen on TV

5.14.2012

Toilet Paper Roll Craft: Charlene's Mini Album

Charlene from Scrapateers entered my recent Toilet Paper Roll Challenge and created this adorable mini album:


Visit Charlene's blog to see additional photos of her toilet paper roll mini album and learn how she made it.

Additional Toilet Paper Roll Crafts:

Toilet Paper Roll Bunnies

3.17.2012

Tutorial: St. Patrick's Day Rainbow Mini Book Cover

Happy St. Patrick's Day! As you know, I'm always finding ways to turn trash to treasure and this rainbow made from bathtub crayons is just one of them:

St. Patrick's Day Rainbow Mini Book Cover

I've been saving the bathtub crayon cases for some sort of rainbow project and since it's St. Patrick's Day, there's no better time than now. The naked mini book is a whole 'nother story. I've had that for about five years (*cringe*), but as I've said before, I'm all about using up my stash this year.

Okay...let's get started!

Supplies:

mini book
bathtub crayon cases (red, orange, yellow, green, blue, purple)
Glue Dots® (Lines, XL, Mini)
ribbon (printed, plain)
floss
button

1. Pop out the white "push-up" piece for each bathtub crayon case. Wash and dry the cases.


2. Place a strip of Glue Lines® in the center of the mini book cover and adhere the printed ribbon to it.


3. Adhere a Glue Line® to the red bathtub crayon case and attach to the cover. Repeat for the rest of the crayon cases. 


4. Add another strip of Glue Lines® across the rainbow to wrap and secure the ribbon. Set aside.


5. Make a knot at the end of the plain ribbon.


6. Place the knot in the center of an XL Glue Dot®. Wrap and fold the rest of the ribbon around it to make a ribbon flower.


7. Fold the ribbon end underneath and use another XL Glue Dot® to attach it to the center of the ribbon-wrapped bathtub crayon rainbow.


8. Tie floss through a button, make a bow and use Mini Glue Dots® to attach it to the ribbon flower.


All that's left to do is fill up the mini book with St. Patrick's Day memories! Hope you have a lucky day! ~Danielle 

Additional St. Patrick's Day Fun:


Disclosure: This blog post was written while participating on the Glue Dots design team.

10.31.2011

A Halloween mini-book + googly-eyed fingernails

Halloween is here and I love this day! In fact, I'd rather decorate for Halloween than Christmas and we usually end up taking the decorations down after my oldest daughter's November birthday. 

We've picked and carved our pumpkins (and painted/glittered two small ones), toasted pumpkin seeds, drank apple cider, ate caramel apples, planned costumes, made a newspaper leaf wreath, painted papier mache masks, stuffed treat bags, decorated fingernails with googly eyes:

An extra Glue Dots Dottess project of mine: Attach googly eyes to fingernails with Glue Dots®.

And I finally finished my Halloween mini-book that I started last fall at a Creative Memories crop (shhh, don't tell the MemoryWorks folks). I was given cut cardboard leftover from scrapbook paper kits, a Creative Memories Halloween-themed kit and the ladies kindly binded the book for me. It's been sitting in my scrap cabinet with my 2010 Halloween photos ever since.

Have a look:

My Halloween mini-scrapbook made with leftover cardboard.

I also purchased K&Company Halloween diecuts on clearance last year and they went perfectly with the Creative Memories kit, along with the black glittered Thickers that I used on the front cover. (I used Glue Dots® to put everything together.)

The "2010" Thickers were a perfect match for the K&Company Halloween diecuts.

My oldest daughter loves to dress up scary!

Pumpkin carving is always a treat (and creepy if you don't like pumpkin guts).

Photo Tip: Turn off the lights and your camera flash for the perfect jack-o-lantern photo.

Although the items I used are from my regular scrapbooking stash (I have a separate eco-friendly scrapbooking supply box), I didn't buy anything new for this project and the repurposed cardboard from 12x12 kits is definitely ecoscrapbooking. 

Now it's time for parties, trick-or-treating and more Halloween photos that will lead to even more scrapbooking...until next year, my spooky friends! Hahahahaha (that was an evil laugh). Enjoy your day!

Related:


Disclosure: This blog post was written while participating on the Glue Dots design team.