Showing posts with label party decoration. Show all posts

7.03.2013

5 Summer Project Ideas

For most people, summer started on June 21, but with one hectic mom schedule, my summer started this week. Let's kick it off with five of my favorite summer-themed projects. Have a look....


Hope your summer is off to a great start! ~Danielle

Since Google Reader has said goodbye, I signed up for BlogLovin'. You can now follow my blog's feed from BlogLovin' and/or sign up for (soon to be monthly newsletter) The EcoScrapbooker from the sidebar. Thanks!

3.06.2013

Upcycled St. Patrick's Day Craft Projects

It's that time of year again! Bring out the clover decorations, catch those leprechauns and find a pot o' gold at the end of a rainbow! Kiss me, I'm Irish... St. Patrick's Day is near!

Some of my favorite and most popular craft projects were created just for March 17th, but the fun begins weeks before St. Patrick's Day. You can read more about our family fun and the leprechaun named Roger here

Today's post is a round-up of my upcycled St. Patrick's Day craft projects. Click the links for tutorials!

Upcycled St. Patrick's Day Crafts


Do you celebrate St. Patrick's Day? If so, what do you enjoy most about it? ~Danielle

5.23.2012

Tutorial: Memorial Day Flag Centerpiece

Are you looking to add a little patriotic flair to your upcoming Memorial Day celebration? This flag centerpiece may be exactly what you need:

 
Supplies:

Craft Glue Dots©
glass jar
3 bamboo skewers
15" wire (red)
9 star buttons (red, white, blue)
large paper scraps (red, white, blue)
jar filler (buttons, candy, ribbon, etc.)

1. Cut each color of paper to 7x2". Fold in half and make a triangle cut at the end of each flag.

2. Attach the flags to the bamboo skewers with Craft Glue Dots©.

3. Place the flags into a glass jar.

4. Fill the jar with red ribbon-tied bells as shown or use buttons, candy, etc. as filler.

5. Thread the buttons onto the wire, wrap around the top of the jar and twist together to secure.

Now you have a quick and easy way to add a little red, white and blue to your Memorial Day picnic. Enjoy! ~Danielle

Additional Glue Dots Projects:

Upcycled Flower Carrier
This blog post was written while participating on the Glue Dots design team.

2.08.2012

It's Orange & Teal Party Time! Meet the Newest Glue Dots®!

Let's say hello to the newest additions to the Glue Dots family...


Welcome XL and XXL Glue Dots® - Two new sticky companions in my scrapbooking and craft arsenal. 

The XL Glue Dots® are 1" in diameter and come in a pack of 60, while the XXL Glue Dots® are 2" in diameter and have 24 adhesives in a pack. Just like other Glue Dots®, the XL and XXL are acid-free, lignin-free and non-toxic.

As a Glue Dots Dottess, I had a chance to play with both adhesives before they were introduced at the Craft & Hobby Association's Winter Trade Show. Have a look:

Orange & Teal Party: Introducing XL & XXL Glue Dots®

Up first, an orange and teal party snack holder created with french fries in mind. Read on to find out why...

Orange & Teal Party Snack Holder Tutorial

Supplies:

Glue Dots® (Mini, Glue Lines, XL)
small french fry holder
teal decorative cardstock
orange, white plain cardstock
orange rafia
cupcake punch (EK Success)
circle punches (Creative Memories Circle Maker)
scoring tool

1. Open the french fry holder and lay flat on the teal cardstock to act as a template. Trace the template onto the cardstock and cut out.

2. Score creases into the cardstock to match the creases of the french fry holder. Fold along the creases.

3. Secure the flaps down with Glue Dots Glue Lines®.

4. Place an XL Glue Dot® on the front of the snack holder and wrap orange rafia around it.

5. Punch out a large white circle and attach to the XL Glue Dot® on the snack holder. Make a small orange circle and attach to the white circle using another XL Glue Dot®.

6. Create a teal cupcake using the cupcake punch and adhere to the orange circle using Mini Glue Dots®.

Repeat for each snack holder you wish to create.

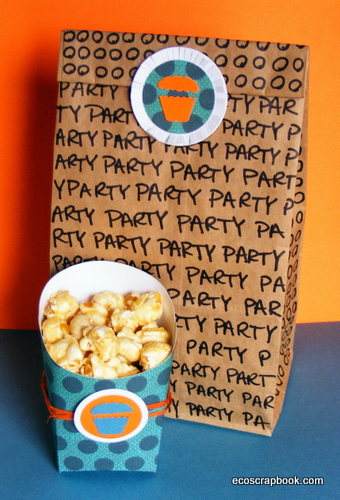
Next, I'm sharing an orange and teal party treat bag to match the above snack holder:

Orange & Teal Party Treat Bags

Supplies:

Glue Dots® (Mini, XL, XXL)
brown paper lunch bags
black marker (Sharpie)
teal decorative cardstock
orange, white plain cardstock
cupcake punch (EK Success)
circle punches
scissors

1. Decorate the brown paper bag with a black marker.

2. Punch out an orange cupcake and a small teal circle. Attach the cupcake to the teal circle using Mini Glue Dots®.

3. Punch out a large white circle and use scissors to fringe the edges. Use an XL Glue Dot® to attach the teal circle to the white fringed circle.

4. Create another large white circle and use another XL Glue Dot® to attach it to the back of the white fringed circle.

5. Attach the circle embellishment to an XXL Glue Dot®.

6. Fill the bag with goodies and fold to close. Attach the circle embellishment with the XXL Glue Dot® to the bag to secure it closed.

Repeat for each treat bag you wish to create.

And that's just a tiny sampling of what you can do with the XL and XXL Glue Dots®. I'm looking forward to spending more time with these two and see what else we can make together! (Sorry for the mild dorkiness...feeling a bit cheesy as I write this and excited to share with you!)

Additional Glue Dots® Tutorials:


Disclosure: This blog post was written while participating on the Glue Dots design team.

12.26.2011

Tutorial: Make a confetti dropper for your New Year's Eve party in less than 30 minutes

It's New Year's Eve and you're desperate for a fun and quick decoration. What do you do?

Grab a large gift bag, tissue paper, Glue Dots® and all those tiny pieces of scrap paper you've been saving all year and let's make a confetti dropper!

DIY Confetti Dropper for New Year's Eve
Supplies:

Glue Dots® (Lines, Removable)
large gift bag
rope handles from the gift bag (tied together)
tissue paper
scrap paper
scissors

1. Cut out two large circles from the gift bag. Cut a small circle in the center of one of the large circles (this will be the top circle).

Tip: Don't have a large gift bag? Try newspaper instead.

2. Adhere Glue Dots Glue Lines® to the outer edges of the bottom circle to attach the top circle.

Craft Glue Dots® can be used in place of Glue Lines®.

3. Cut a circle into the tissue paper (I double layered the tissue paper) slightly larger than the small circle from Step 1. Make a small slit into the center of the tissue paper circle and insert one side of the rope handle. Secure the rope to the tissue paper using a Removable Glue Dot®.

Make sure you secure the rope to the tissue paper with a Glue Dot®.

4. Add confetti to the gift bag circle.

Confetti is the perfect reason to save all those tiny pieces of scrapbook paper!

5. Tuck the tissue paper into the center of the gift bag circle.

Almost ready! One more step...

6. Cover the back of the gift bag circle with plenty of Removable Glue Dots® before attaching to the ceiling. (Shhh...mine is still up and I made this project in November!)

The Removable Glue Dots® dot runner makes this process even faster!

When it's midnight, pull the rope and watch the confetti pour down!


Disclosure: This blog post was written while participating on the Glue Dots design team.