Showing posts with label card. Show all posts

4.02.2014

Easter Craft Round-Up

I love April! The weather is warmer and I'm celebrating two special days this month. 

First is April 20, which is Easter and my birthday! As a child, when my birthday fell on Easter, I often had a bunny cake and was extra spoiled during family get-togethers. Next up is April 22, Earth Day, and I'm sharing daily EcoScrapbook tips on Facebook and Twitter all month long.

Let's get in the Easter spirit with a round-up of fun and easy crafts! Enjoy! ~Danielle


6.26.2013

Recycling Greeting Cards with St. Jude's Ranch

Do you save your cards? I find it hard to throw out the cards my family receives during the holidays, on birthdays and other special occasions. Sometimes I reuse pieces of them on my scrapbook layouts or handmade cards, while I keep others as memorabilia.

What about the extras? We sent our greeting cards to St. Jude's Ranch for Children.


St. Jude's Recycled Card Program was developed to help homeless and neglected children and their families. Cards are collected to create new ones that are then sold in packs of ten for $10.

How can you get involved? Round up your cards and send them to:

St. Jude’s Ranch for Children
Recycled Card Program
100 St. Jude’s Street
Boulder City, NV 89005

Please note that they do not take Hallmark, American Greetings or Disney cards or cards with writing on the back of the front of the cards. This was the most difficult part of the process as the majority of cards my family receives are Hallmark, but my youngest daughter and I managed to find close to 50 cards to donate.

Visit St. Jude's for more information about their Recycled Card Program and to learn how you can purchase the child-created cards. ~Danielle

Related:

Tutorial: Father's Day Cassette Tape Card
Christmas Cards: Peace on Earth(Day)
Recycle Old Greeting Cards into Summer Party Invitations

5.22.2013

Tutorial: Teacher Thank You Card

The school year is coming to an end and it's time to show appreciation to the teachers in our lives. Here's an easy thank you card that's perfect for any teacher:


Supplies:

Glue Dots® (Glue Lines, Micro)
cardstock (kraft, red, yellow, blue)
letter stickers (American Crafts Thickers)
floss (We R Memory Keepers Sew Easy)
notebook paper
buttons (red, yellow, blue)
scissors
paper cutter

1. Cut a 6" x 8" piece of kraft cardstock and fold in half to make a card.

2. Attach letter stickers to the bottom right-hand side of the card to spell out "thanks".

3. Make three 1 1/2" x 3/4" flags out of notebook paper and mat each with cardstock (red, yellow, blue) using Glue Dots Glue Lines® to attach them together.

4. Adhere two Glue Dots Glue Lines® to the back of each matted flag, one on the center and one at the top, leaving 1 mm of adhesive exposed on the front of each flag. Attach the flags to the card as a banner.

5. Apply floss to the top of the exposed Glue Dots Glue Lines®.

6. Make three small bows out of floss and attach to the banner using Micro Glue Dots®.

7. Attach buttons to the center of each flag using Micro Glue Dots®.

There are plenty more tutorials to check out! See a few of them below! ~Danielle


Disclosure: This blog post was written while participating on the Glue Dots design team.

6.06.2012

Tutorial: Father's Day Cassette Tape Card

Normally, I go for the super fast and simple crafts. Then there are times when I get an idea in my head and have an end point in mind, but not exactly sure how I'm going to get there.

This Father's Day cassette tape card was one of those ideas and I had loads of fun making it:

Cassette Tape Card for Father's Day

Even though we don't have a workable cassette player easily accessible, I had to say goodbye to my long-forgotten-from-the-80s-hair-band KIX single "Don't Close Your Eyes" and tore out the cassette's ribbon in the name of love (and you'll see why soon).


This is how I made it:

Supplies:

Glue Dots© (Pop Up, Ultra-Thin, Micro)
old cassette tape and case
white & yellow cardstock (DCWV)
red decorative cardstock (Simple Stories 100 Days of Summer)
diecuts (Creative Imaginations "Super Hero")
hole punches
letter stickers (Cosmo Cricket)
black pen
word processor


1. Cut and score white cardstock according to cassette card panel template: tail 1", spine .5", front cover 2.5625", 1 extra panel 2.5", 2nd extra panel 2.4375", width 4". (Note: I didn't download the template, but used approximate measurements.)

2. Decorate the outside of the card with diecuts, letter stickers, doodled children and strips of text made from a word processor. Attach to the card using Ultra-Thin and Micro Glue Dots©. Outline the elements with black pen if desired. Set aside.

Cassette Card Panel: Outside

The front cover, spine and tail:


The first extra panel:


And the second extra panel:


3. Create a paper cassette tape using the red and white cardstock, hole punches, star diecuts and black pen. Use an old cassette tape as a guide. Adhere all the elements together using Ultra-Thin Glue Dots© and add dimension to the bottom piece of cassette using Pop Up Glue Dots©. Set aside.

Handmade Paper Cassette Tape

4. Remove the ribbon from the cassette tape and cut two strips. Attach both to the inside of the card (opposite side of the front cover) and take the strips down to the bottom panel. Form the inside strip into the word "love" using Micro Glue Dots© as you go along. Repeat with the outside strip to make the word "you".


5. Attach the paper cassette tape to the top panel with Ultra-Thin Glue Dots©. Decorate with additional star diecuts. Fold and insert into cassette case.

Cassette Card Panel: Inside

I was so pleased with myself after making the card that I couldn't wait until Father's Day to show my husband. Now, my oldest daughter wants a card like this one too and she pointed out that I didn't put glasses on her doodled self. Oh boy!...or maybe it should be, Oh girl! ~Danielle

P.S. I HAD to Google "KIX" and found the song! Listen here.

Additional Glue Dots Tutorials:

Memorial Day/4th of July Flag Centerpiece
Upcycled Flower Carrier
Recycle Summer Party Invitations

Disclosure: This blog post was written while participating on the Glue Dots design team.

9.30.2011

Mail Art Exchange: Earth

The people at the post office must be smiling since it's Mail Art time! 

I was first introduced to the Mail Art Exchange by Lisa who received a gorgeous piece of art in the mail from Ginger and Ginger got the idea from Pass the Book. Make sense? Confused? Either way, you can read all about it on Ginger's blog and find out how to participate in the next round.

Anywho...after reading Lisa's Happy Mail post, I jumped at the chance to participate and wasn't I lucky? The theme was Earth.

I dug into my scrap paper container, pulled out leftovers from when I made eco-friendly business card bookmarks with DCWV recycled paper and created this card:

Eco-friendly Greeting Card

I decorated a bill envelope with paint (added in pink glitter but you can't see it here), ink and stamps to send the card to Melissa, who shared the mail art here.

Decorated Envelope for the Mail Art Exchange. 

Then I waited for my mail to arrive from Natalie and boy, I was excited when I spotted it in my mailbox! Who doesn't like receiving beautiful things in the mail?

Eco-friendly Postcard by Natalie of Almost Never Clever.

I love how Natalie decorated chipboard with strips of paper and turned it into an eco-friendly art postcard. This little project is giving me some big ideas!

Stay tuned for the first installment of Scrapbook Saturday as I introduce my long-time Twitter friend, Zaira! Click here to find out how you can be featured on a future Scrapbook Saturday post.

Related:

A Week in the Life of Danielle's Brain and a phone obsession
Illustration Friday: Mysterious
My simple craft room

8.15.2011

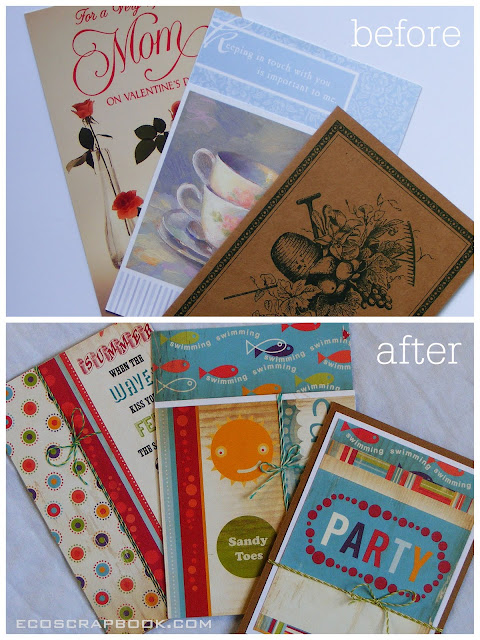
Recycle old greeting cards into party invitations

Summer is quietly sneaking away, but there is still time for an end of summer bash! So gather together some old greeting cards, paper scraps and Glue Dots® to create custom-made party invitations like these:


Recycled summer party invitations


Supplies:

Glue Dots®: Memory Book, Micro
Pink Paislee twine
white cardstock
paper scraps
greeting cards
paper trimmer

1. Measure the greeting cards and create different designs for each card using paper scraps. (I used leftovers from my Cosmo Cricket Snorkel theme set, printed with soy-based ink.)

2. Apply the paper scraps to the front of the cards using Memory Book Glue Dots®.

Old greeting cards: before & after

3. Type and print the party information onto white cardstock. Trim, mat if desired and attach to the inside of each card with Memory Book Glue Dots®.

A look inside the summer party invitations.

4. Tie twine around the front of the cards and use Micro Glue Dots® behind the bows to keep them in place.

The twine is by Pink Paislee, a scrapbook company that offers cardstock printed with soy-based ink.

The twine comes in a variety of color combinations.

Send off your party invitations and have a blast at your summer bash!

Poke a small hole in the fold of the card to wrap the twine around horizontally. 
Swing by my Etsy shop for free shipping, find me on Twitter and chat with me over at Google+.


Related Glue Dots Tutorials:


Disclosure: This blog post was written while participating on the Glue Dots design team.

7.18.2011

I can't stop crafting with Cosmo Cricket and made a retro girl birthday card

Is there a fashionista in your life that's about to celebrate a birthday? This card is for her! Cosmo Cricket's Upcycle theme set turns the clocks back in time with a funky and retro style.

"Retro Girl" Eco-friendly Birthday Card

Supplies:

Craft Glue Dots®
FSC-certified cardstock (@ the Office by Walmart)
Cosmo Cricket Upcycle paper, stickers
Cosmo Cricket Tiny Type letter stickers
small square punch
large circle punch

Here's how I made the card:

1. Trim and fold the cardstock to fit an envelope.

2. Punch eight squares and one circle out of the Cosmo Cricket paper. 

3. Cut a rectangle around a woman's silhouette (found on a notecard in the Upcycle theme set).

4. Adhere the circle with Craft Glue Dots® and add a Cosmo Cricket sticker across the top of the card.

5. Use Craft Glue Dots® to attach the squares and rectangle to the card in the pattern shown.

6. Create a "Happy Birthday" title using Cosmo Cricket's Tiny Type letter stickers and place an extra word sticker below the bottom right square.

Related:


Disclosure: This blog post was written while participating on the Glue Dots design team.