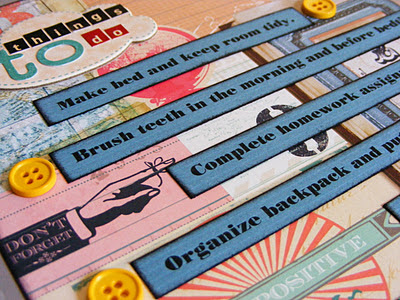
Do you have a forgetful child? Whether it's homework after school or simply brushing her teeth in the morning, I'm constantly reminding my eight-year-old to do the things she needs to complete on a daily basis. In order to stop the nagging AND the forgetfulness, I created a framed "My Things To Do" list that my daughter can check off after completing tasks.
 |
| Framed "Things To Do" List |
The school year can be busy and I'm making it fun with this framed to do list with hopes that my child will be motivated to get things done.
Supplies:
Glue Dots® (Ultra Thin, Micro, Glue Lines)
decorative cardstock (Pink Paislee Daily Junque)
textured cardstock (blue)
chipboard banner and stickers (Cosmo Cricket)
letter stickers (Cosmo Cricket, Crate Paper)
ink
buttons
paper trimmer
picture frame
dry erase marker
twine (Pink Paislee)
1. Cut two sheets of decorative cardstock to fit the picture frame with one sheet slightly larger to act as a mat. Ink the edges of the smaller sheet of cardstock and let dry. Use Glue Dots® Glue Lines to attach to the larger sheet and set aside.
2. Type a list of things to do, print out onto the textured cardstock and use a paper trimmer to cut into strips. Ink the edges of the strips and adhere to the decorative cardstock with Glue Dots® Glue Lines once the ink has dried.
 |
| Ink the edges of word strips to add definition. |
3. Add a button next to each strip of textured cardstock with Ultra Thin Glue Dots®.
 |
| The button can be "checked-off" after completing a task. |
4. Attach the chipboard stickers and letter stickers to the decorative cardstock and place into the picture frame.
 |
| Mix up letter stickers for a fun look. |
5. Use Ultra Thin Glue Dots® to adhere the banner to the outside of the frame and add twine bows to each side of the banner with Micro Glue Dots®.
 |
| Adhere the banner sticker to paper and cut out before attaching to the frame. |
The "My Things To Do" frame is now complete and a dry erase marker can be used to check off the button next to each task on the list.
 |
| Tip: Use a dry erase marker with an eraser attached. |
Other Glue Dots Project Tutorials:
Back-to-school project tutorial: Upcycled pencil holders
Kid's craft tutorial: Newspaper leaf wreath
Recycle old greeting cards into party invitations
Disclosure: This blog post was written while participating on the Glue Dots design team.
